Converting a standard VBA macro into an Excel add-in (.xlam file) allows you to run your custom tools across any workbook without copying code, cluttering spreadsheets, or relying on personal macro workbooks. If you want to create an Excel add-in from a VBA macro, this guide will walk you through the entire process step by step—from preparing your code to installing your custom .xlam file in Excel.
Why Create an .xlam File in Excel?
Standard .xlsm workbooks tie your VBA code to a single file. In contrast, an Excel Add-In (.xlam) operates quietly in the background every time Excel opens.
-
Global Accessibility: Use your custom macros on any open spreadsheet without switching files.
-
Cleaner Workbooks: Distribute functionality without embedding code into client or team files.
-
Easy Updates: Updating one .xlam file automatically updates the macro for every linked user.
Step-by-Step Walkthrough to Turn a VBA Macro into an Add-In
1.Prepare and Test Your VBA Macro:Ensure your code runs independently of specific sheet names.
Before you make an Excel add-in, verify that your VBA code works without relying on a specific active worksheet name unless intended.
-
Open Excel and press
Alt + F11to open the VBA Editor. -
Insert a standard module (
Insert>Module). -
Paste or write your macro code.
-
Replace references like
Sheets("Sheet1")withActiveSheetor dynamic workbook references so your code works across any active file. -
Test your macro inside a standard sheet (
Alt + F8) to ensure it executes cleanly without runtime errors.
2.Configure Workbook Properties:Provide a name and description for the Excel Add-in manager.
Setting metadata helps Excel identify your tool when users view their installed add-ins list.
-
In the VBA Editor (
Alt + F11), locate the Properties pane (pressF4if hidden). -
Select
ThisWorkbookin the Project Explorer (Ctrl + R). -
Change the
IsAddinvalue to true.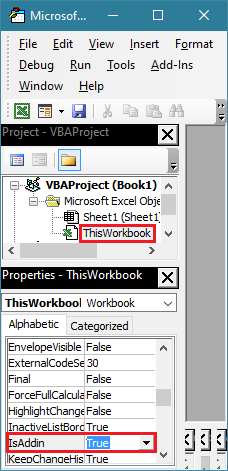
- Save your changes
3.Save as an Excel Add-In (.xlam):Export your workbook into the .xlam format.
To create a .xlam file in Excel, you need to save the file under the proper add-in format.
-
Return to the main Excel sheet and click File > Save As.
-
Click Browse and open the Save as type dropdown menu.
-
Select Excel Add-In (*.xlam).
-
Excel will automatically redirect the file path to your local
AddInsdirectory (e.g.,C:\Users\<User>\AppData\Roaming\Microsoft\AddIns). Note: You can save it here or choose a shared network folder for team access. -
Enter a clear file name and click Save.
4.Install and Activate the Add-In in Excel:Enable your newly created add-in.
Once saved, you must activate the add-in within Excel to make your macros available globally.
-
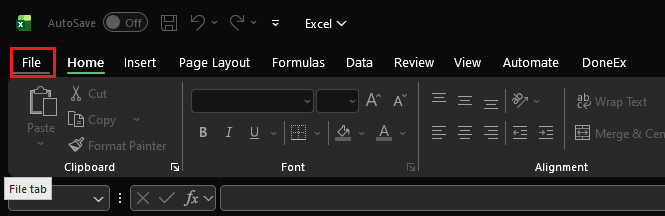
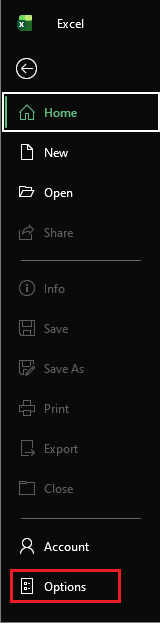
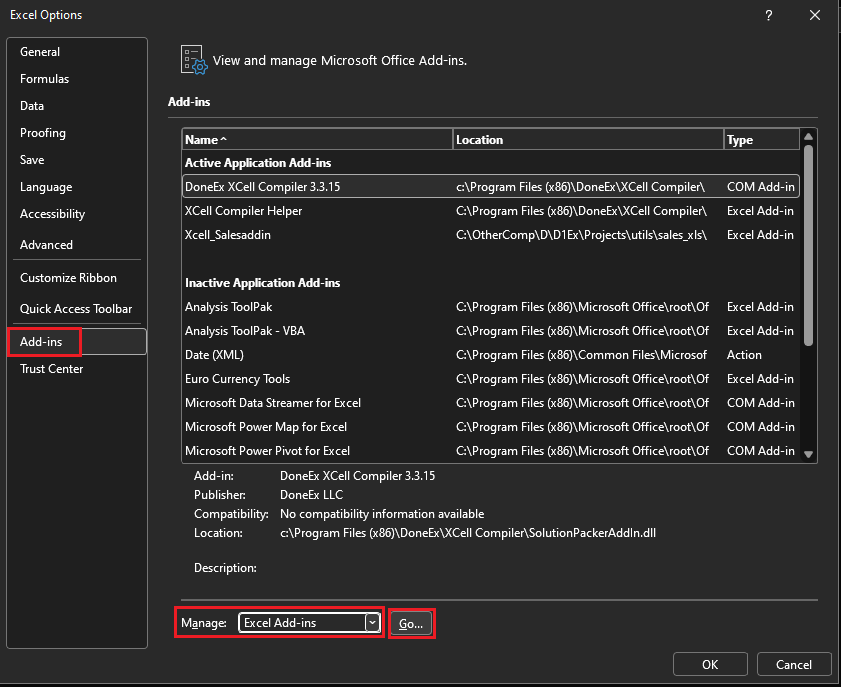
In Excel, go to File > Options > Add-ins.
-
At the bottom of the window, ensure Manage: Excel Add-ins is selected and click Go…
-
Check the box next to your new add-in in the list.
-
If your file isn’t listed, click Browse…, navigate to your saved
.xlamfile, and select it. -
Click OK. Your add-in is now active across all open and future Excel workbooks.
Best Practices for Managing Excel Add-Ins
When you create an Excel VBA add-in for wider distribution or personal efficiency, keep these three practices in mind:
1. Adding Ribbon or Menu Controls
Because .xlam files hide their sheet interface when loaded, users won’t see a standard sheet to click buttons. Use custom Ribbon XML or add macro shortcuts to the Quick Access Toolbar (QAT) so users can trigger your code with a single click.
2. Handling File Path Permissions
If you share your .xlam file with colleagues, ensure they save it to their local AddIns folder or a shared network drive where they have read/write permissions.
3. Protecting Your Source Code
VBA project password protection prevents unauthorized edits, but standard VBA passwords can be easily bypassed. If you are distributing proprietary business logic or commercial tools, consider compiling your VBA code into a native dynamic link library (.dll) or executable using dedicated tools to secure your intellectual property.
Explore Also:
How to Protect and License Excel Add-In from Being Pirated or Shared


