VBA code Command Line Compilation
Markedly, VbaCompiler for Excel allows for the compilation of VBA code from the command line.
This is a convenient way to compile VBA code, even if the VBA code contains large amounts of Excel files in batch mode or just for registration key generation from the command line.
All in all, this feature becomes available in the registered version of VbaCompiler for Excel.
Prerequisites
The computer where you want to call VbaCompiler for Excel from the command line should have Windows 7 or higher installed, as well as Excel 2007 SP3 or higher. Also important is that Microsoft Excel should have the latest service pack and updates installed. Finally, with these prerequisites, you should be able to initiate the compilation of VBA code from the command line.
Syntax for VBA Command Line Compilation
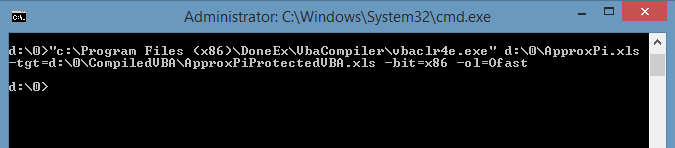
To clarify, VBA compilation command line prompts should follow this syntax:
vbaclr4e.exe <name of the excel file with VBA code> [-switch[=value] …]
-novm – This switch prevents a compiled workbook or add-in from running on virtual machines. Markedly, there is no value to assign to this switch. This option is only available when you register the product with the Professional license.
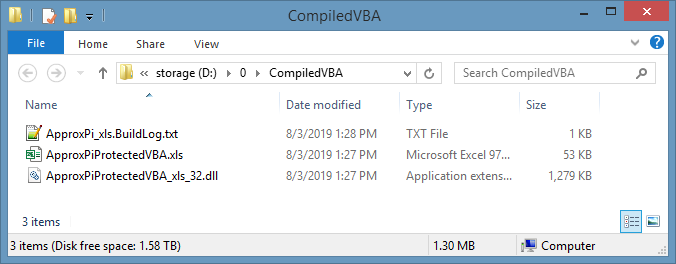
-tgt – The full name of the target workbook. This parameter defines the location as well as the file name of the target xls file with the compiled VBA code. Important: Make sure that output folder exists and is empty before compilation.
Example:
-tgt="c:\MyFolder\CompiledVbaCode\Sample.xls"
-wkpath – This switch defines the work folder. The work folder is the place on your computer disk where all temporary and intermediate files are created and/or stored during VBA code compilation. Use this option to reduce the false positive detections of antivirus software. To achieve this you will also need to enter the same folder path to the antivirus software exception list.
Example:
-wkpath="C:\Users\CurrentUser\Documents\VbcWork"
-acontact – The author contact as an email address or http web address.
Example:
-acontact=support@doneex.com
-appname – The application name. The internal name of the application which the compiler uses for coupling the compiled VBA code and the registration key file.
Example:
-appname=”My Workbook Application”
-unviewable – The flag that makes VBA code unviewable. This switch enables the unviewable VBA project mode for a workbook with compiled VBA code and doesn’t need any value assigned to it.
Example:
-unviewable
-custom_rsc– The full name of the custom resource dictionary file. This switch attaches a custom resource dictionary file to the compiled workbook.
Example:
-custom_rsc=”c:\SomeFolder\MyAppEnglishDictionary.txt”
Compiler Settings:
-cc – The selection of the backend C compiler. This option is only available when you register the product with the Professional license. VbaCompiler for Excel can use 2 different backend C compilers: MinGW GCC–which is the default and distributed with the VbaCompiler installation– and Microsoft Visual C– which is not distributed with the VbaCompiler for Excel installation. To use Microsoft Visual C you need to download Microsoft Visual Studio and install it by yourself. This switch may have 2 values: g, for MinGW GCC, and v, for Visual C. If Visual C is selected then you need to use the -vcpath switch to point the Visual C location.
Example:
-cc=v
-vcpath – The path to the Microsoft Visual C compiler if it is selected as the back-end compiler with the switch -cc.
Example:
-vcpath="c:\Program Files\Microsoft Visual Studio22\Community\VC\Auxiliary\Build"
-ol – The c-compiler optimization level. Valid values of the -ol switch for MinGW GCC C compiler are: O0, O1, O2, Ofast, Os. You may find the meaning of each value in the VbaCompiler for Excel compilation options description. If the switch is excluded, then the default value O1 is used. In case if you have selected MS Visual C compiler as backend C compiler then the valid options of -ol switch are: O1, O2, Od, Oi, Os, Ot, Ox, Oy.
Example:
-ol=Ofast
DLL Settings:
-bit – The bitness of the compiled DLL file—can be 32 or 64 bit. Available values for this switch are x86 for 32 bit, x64 for 64 bit and 32×64 for both 32 and 64 bit. The default value is x86.
Example:
-bit=x86
-packdll – This switch enables the single file compilation output result with the DLL embedded inside of the compiled workbook or add-in. Markedly, there is no value to assign to this switch. This option is only available when you register the product with the Professional license.
-prepack – This switch allows you to specify the path to a command batch file that will execute before packing the compiled DLL(s) into the compiled workbook. Please note that this switch can only be used in conjunction with the -packdll switch. The <?DLLPATH?> tag will be replaced with the path to the currently compiled DLL. Use this switch to apply a digital signature to your compiled DLL file before it becomes embedded within the compiled workbook. This option is only available when you register the product with the Professional license.
Example:
-prepack="c:\MyFolder\digisign.cmd <?DLLPATH?>"
-tdll – The name of the target dll. If this switch is missing, then the compiler will use the default value. The default value is equal to the name of the workbook plus the defined bitness of the compilation as an additional substring. For example, in the case of the workbook with the file name of “Sample.xls” — the default dll name will be “Sample_xls_32.dll”.
Example:
-tdll="MyFileName.dll"
-dll_ver – The compiled DLL file version number passed as a string value. It will be visible in the compiled DLL file Properties >> Details tab.
Example:
-dll_ver="1.2.3.456"
-copyright – The copyright of the DLL file. It will be visible in the compiled DLL file Properties >> Details tab.
Example:
-copyright="All Rights Reserved (c), 2024"
-altpath – The DLL alternative path. The DLL alternative path field defines the alternative location of the compiled DLL.
Example:
-altpath="c:\MyFolder"
Hardware Locking Switches:
-rkname – The name of the registration key file. This switch enables the “Copy protection with registration key” mode.
Example:
-rkname=”MyApplication.rkey”
-rkpath – The alternative location for the registration key. This switch allows you to set the path to an alternative location of the registration key on the customer’s computer. This location is an alternative to the default location of registration key – the folder where DLL with the compiled VBA code is located.
Example:
-rkpath="C:/RegkeyLocation"
-hwlock – The hardware locking flag. Use this switch to enable the hardware locking option. Markedly, there is no value to assign to this switch. This switch must be used in combination with the -rkname switch to take effect.
Example:
-hwlock
-freemium – This switch enables ‘Freemium mode’ and must be used with the -rkname switch to be effective.
Trial Switches:
-trial – The flag that determines a trial/demo version with a number of trial days as a value. This switch enables the Trial/Demo mode for a compiled workbook, and it must be used with the -rkname switch to be effective.
Example:
-trial=3
-nag_once_aday – This switch enables showing trial or freemium message once day only. Markedly, there is no value to assign to this switch. This switch should be used with -trial or
-freemium switches.
-trial_nag_delay – The trial nag window delay before the ‘Close’ button becomes shown, determined in seconds. This switch’s value is the time of the delay in seconds. It must be used with the -trial or -freemium switch to have any effect.
Example:
-trial_nag_delay=10
Create registration/activation key for VBA Code using Command Line Compilation
Syntax for command line registration key generation
vbaclr4e.exe <the full name of the compiled VBA dll file> -rkgen=<the full name of the ini-file with regkey parameters>
-rkgen – the registration key generation for VBA code compiled with the ‘Copy protection with registration key’ mode enabled. The value assigned to this switch must be the full name of the file in ini-file format containing the parameters of the registration key.
Example:
-rkgen=”c:\SomeFolder\RegKeyGenParams.ini”
Example of the registration key parameters inside of the ini-file
name=Customer Name
email=CustomerName@email.com
date_from=01/22/2019
date_to=02/22/2020
compid=M5YN-J7XB-MB9M-EIMM-ZYI9D-HQTAA
The key value on the left side of each ‘=’ symbol must remain the same, as shown previously in the example. Each key value indicates the following:
name – The customer’s name.
email – The customer’s email.
date_from – The date of the beginning of the registration key validity term.
date_to – The date of the end of the registration key validity term
compid – The customer’s computer id.
Example of a registration key command:
vbaclr4e.exe “d:\VbaCompiledFiles\ApproxPi_xls_32.dll” -rkgen= “d:\regkey.ini”
You may find the status of the VBA code command line compilation in the build log file, which is located inside your target folder.
The name of the build log file is <name of workbook>.BuildLog.txt.
Useful Practices for VBA Code Command Line Compilation
– Use a .bat or .cmd file to store your compilation script and run this file instead of just typing out the command line in the cmd window.
– Make sure that the target folder exists and is empty before compilation.
– Use a standard output redirection command at the end of your command, like so: >filename.txt
This file will then contain the compilation output info or the error description should an error happen.
For example:
vbaclr4e.exe "C:/0/myworkbook.xlsm" -tgt="C:/0/VbaCompiled/targetWorkbook.xlsm" >output.txt
– To begin with, try to compile with the minimum amount of parameters as the first step. If this minimum parameter compilation completes successfully, then you may increase the amount of compilation parameters.