How To Compile VBA Code
Compiling your VBA code into a native Windows DLL can significantly enhance the performance and security of your Excel projects. Whether you’re working with a complex workbook or an add-in, using VbaCompiler for Excel allows you to transform your VBA code into a compiled, native Windows DLL that may run even faster than the original workbook macros. In this guide, we’ll walk you through the 10 essential steps to prepare, compile, and output your VBA code. Following this guide will ensure a smooth VBA code compilation process from start to finish. A task that is usually very difficult (even insurmountable for most) becomes as trivial as downloading VbaCompiler, setting some options, and clicking a button!
The video shown here is a guide made to cover the basics of using VbaCompiler. From downloading and installing the compiler, to using basic features such as the Target Excel Bitness option (which can target 32 Bit Excel, 64 Bit Excel, as well as both with the Professional License) and the C Compiler Optimization options. This video guide also covers generating and running your first compiled workbook file. With this short yet detailed guide, you can protect your VBA code with completely impenetrable VBA code protection!

By following these next steps, you’ll unlock the full potential of your Excel applications while keeping your code secure and optimized.
10 Easy Steps to Compile VBA Code into a Native Windows DLL
Prerequisites
You need to have the desktop Microsoft Windows OS 7 or higher and Microsoft Excel 2007 or higher (Microsoft Excel 2010, 2013, 2016, 2019, as well as Office 365 is supported) installed on your computer.
After going through these 10 steps your VBA code will be compiled:
1. Download the VbaCompiler for Excel on your computer.
2. Install the VbaCompiler for Excel.
To install the product you need to start VbaCompiler4Excel.msi file and follow the installer steps.
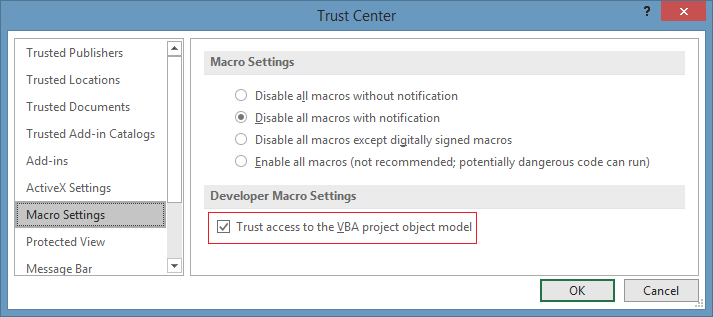
3. Enable “Trust access to the VBA project object model” MS Excel option by following the path:
Excel Options >> Trust Center >> click button “Trust Center Settings…” >> Macro Settings >> enable check box “Trust access to the VBA project object model”
4. Examine your VBA code for syntax errors.
To do that you need to run the embedded Visual Basic code analyzer, located by following this path:
VBA Project window (Alt + F11) >> Main menu >> Debug >> Compile VBA project
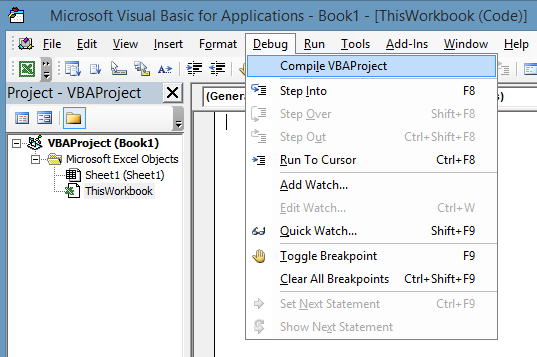
if after running “Compile VBA Project” Excel found a syntax error, then you need to fix it. Once you have done so, repeat this step again. This must be done until the “Compile VBA Project” menu item is greyed out.
IMPORTANT NOTE: When you have finished this step your VBA code is not compiled yet. There are just a few more steps to go!
5. Make backup copy of the file you are going to compile.
The simplest way of doing this is to copy the file into another folder on your computer.
NOTE: The VbaCompiler for Excel doesn’t change your original file.
However it is always a good practice to have a backup copy of your original file.
6. Remove the VBA Project password in the file you are going to compile.
You can apply it later, on to the VBA Project of the file with the compiled VBA code.
This step is required because the VbaCompiler has to get full access to the VBA code.
7. Run VbaCompiler for Excel by launching it using the shortcut on the Windows desktop.
You can also launch the compiler using the shortcut created in the start menu, which is located under the DoneEx folder.
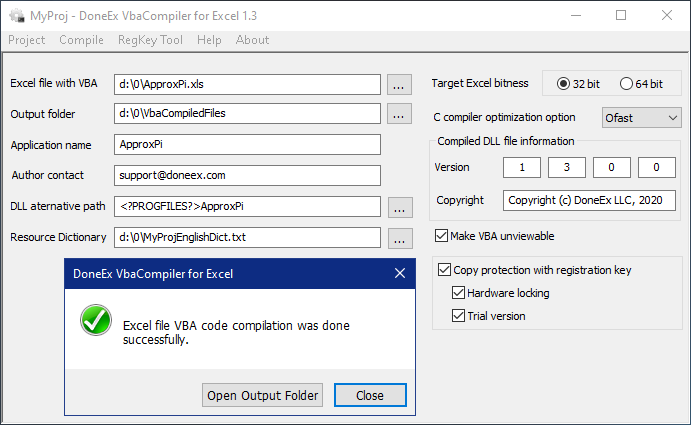
8. Enter the name of file you want to compile.
While you can type or paste the path and name of the file into the “Excel file with VBA” edit field, the easiest way is to select the file is by clicking on the […] button located next to that edit field. A dialogue window will pop up. You can browse to and select your desired file that you wish to compile using this dialogue window.
9. Enter the output folder where resulting files/modified excel file and Windows DLL with compiled VBA code will be located after compilation.
While you can type or paste the path of the folder into the “Output folder” edit field, the easiest way is to select the folder is by clicking on the […] button located next to that edit field. A dialogue window will pop up. You can browse to and select your desired folder that you wish to have your compiled file appear in using this dialogue window. You can find the meaning of each of the compilation options on the VBA Compiler options page.
10. Click on the ‘Compile’ main menu item and wait until VBA code compilation is finished.
Upon a completed compilation, You will see a window pop up notifying you of the state of the operation. An example of this pop up message can be seen in this screenshot:
In Conclusion
It is just that easy to compile your Excel VBA Code into a native Windows DLL file!
If you have come across problems in your compilation process, please check out this troubleshooting guide. You may find answers to your problems or concerns about the product or compilation process amongst these Frequently Asked Questions.
If after reading through those pages you are still having problems, please contact our DoneEx support team! You can find information on how to contact our support team on our Contact page, which is located here.